What is hypertufa?
Hypertufa is an anthropic rock made from a mixture of aggregates, including cement. It is a great substitute for natural tufa, which is a type of porous limestone rock often used in garden stoneware.

Planters, stone troughs & pots are expensive!
I think we would all agree that buying authentic garden stoneware can be a very costly affair. You’d normally expect to pay anything from £100 ($130) to £300 ($400) for a simple pot or planter.
Don’t despair! There is a much cheaper option available.
Anyone can achieve great results with a wonder material called hypertufa. Hypertufa planters, pots, troughs and garden ornaments will look great in any garden.
Make your own garden-wear, with my hypertufa recipe!
Relax! Hypertufa is not some kind of expensive, trademarked compound. It is very cheap and easy to make. This article will show you step-by-step, how to build a highly realistic, stone-effect planter or pot from as little as a couple of quid!
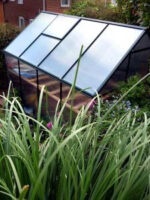
A while back, I whittled together this impressive hypertufa stone-effect trough (above). It cost me just £3 ($4) to construct. By the way, this example is not for sale! After just one week, my trough looked very much like real stone. I can’t wait until it is populated with lichen and moss.
Bare in mind that I am not a stonemason. Working with hypertufa is so straight forward. It’s very easy to create breathtaking rustic garden features that will definitely improve with age.
a recipe without peat
Hypertufa is made of equal parts of cement, sharp sand (or perlite) and peat moss or coconut fibre (coir). See fig 1. Please keep in mind that cement isn’t at all environmentally friendly. To reduce my carbon footprint, and make a planter without peat, I tend to use left-over cement from other projects. I use coir (a sustainable media) instead of peat moss (another alternative organic ingredient). Coir is a natural fibre and by-product, extracted from the husk of coconuts. It can be found in most garden centres and hardware stores and is usually sold as a water expandable compost substitute.
How to build realistic hypertufa pots and troughs
This project will cost about £3 ($4) per unit (or £10 ($13) set-up for a one-off). That is about 5% of the cost of a real stone trough! Before starting to construct your hypertufa planter, please make sure you have the following items on hand. I have personally made many items using this recipe:
- 1 large mixing bucket
- 1 pair of rubber gloves to protect your skin
- 1 garden trowel for mixing
- 1 part sharp, gritty sand (or perlite if you want a lighter mix)
- 1 part cement. Use Portland cement and not premixed
- 1 part coconut fibre (coir), preferably fine grain
- 1 good sized cardboard box (a great hypertufa mould!). You can also use Styrofoam/polystyrene foam. If you are making a pot, a plastic garden planter will be perfect. Home insulation panels also make very useful moulds. You can fasten then together with BBQ sticks
- 1 slightly smaller cardboard box
- A handful of synthetic concrete reinforcing fibres (optional)
- Bricks for supporting box sides during curing
- A flexible butter knife for sculpting
- Water
- A dry and frost free environment!


Constructing the trough/pot
- Soaking Coir: Soak the Coir overnight in a bucket of water until it has fully expanded. If you can’t get your hands on Coir, you can also use peat moss (not very environmentally friendly) or perlite (some environmental concerns)
- Base mixture: Whilst wearing rubber gloves, mix enough of the following for the base section only at this stage. Mix together equal parts of sand, fresh cement, and coir/peat moss together, adding water until your mixture is of the consistency of thick porridge. Mixing well is the key to the strength and longevity of your hypertufa pots and ornaments. For extra strength, you can add a handful of synthetic concrete reinforcing fibres
- Larger box: place your larger box on an even surface. I’d suggest you construct your hypertufa project outside but under shelter from the rain. I’d also recommend covering the ground with plastic sheeting to keep things clean and tidy
- Add base and drainage holes: Pour some of the mixture, 2 inches deep into the bottom of the larger cardboard box and spread evenly to create the base of your ornament. Press in a few small and well-placed tubes for drainage holes. Short, cut pieces of old broom-handle are perfect for this job. You can also use plastic or copper piping cut to size
- Base curing: Allow the mixture to partially set (5 hours). Avoid intense heat/sun as this may lead to uneven curing and cracking. Slow and even curing is an essential ingredient for strong hypertufa
- Remove drainage plugs: Carefully remove the drainage plugs. They may prove difficult to extract later once the cement has set. Do this by gently twisting them left and right until they are loose enough to extract from the mix. Fracturing the mix at this point will weaken the hypertufa, so please be careful!
- Place inner mould: Place the smaller box inside the larger box, on top and in the centre of the base mixture (fig 2). Ensure that there is an equal gap between the inner and outer boxes
- Build up sides: Repeat the same mix again (2) for the sides of your pot/trough. Pour the mixture in, filling the gaps between the boxes until you have achieved the desired height. Ensure that the mixture is reasonably level. Pack and tamper down the mix to prevent bubbles and cavities. Don’t be so rough that you damage the curing base
- Support the mould: At this point, the cardboard may start to bulge a little, depending on the size of your trough/pot. Don’t worry as this adds to the stone-like effect. You can prevent excessive bulging by supporting the outside and inside of your mould with bricks (fig 3). Place bricks carefully! Don’t fracture your drying hypertufa!
- Remove mould: After 24 hours (36 hours in colder conditions), peel away the cardboard (if it is still in place) (fig 4). At this point, don’t try and remove the cardboard trapped beneath the pot. Attempting to move your hypertufa pot or trough may damage it as it will be quite fragile at this stage. Personally, I wouldn’t try and move it for at least a week or so. It may appear to be dry, but the microscopic crystals within the cement are still knitting together
- Sculpturing: Take a butter knife and gently smooth the edges down a little and sculpt your trough into the desired effect (fig 5). For extra realism, gently jab to create small linear grooves to add a chiselled effect. This is best done within 24 hours of curing. If the hypertufa has become too hard to sculpt, try using a steel brush to smooth down and shape
- Final curing: Allow to dry for a week or two. Cover over with plastic sheeting to slow the curing process. The slower the curing, the stronger the hypertufa will eventually be
- Planting: It is recommended that you leave your trough empty for a few months. Let the rain wash away the alkaline compounds in the cement, which otherwise may cause your plants to suffer
mold ideas
There are plenty of variant recipes available online. Here is another you might want to try:
And here is another, excellent guide (and brief history lesson) on the subject of hypertufa. I especially like her advice on pack moss on the outside:
How long does hypertufa last?
A hypertufa pot or planter should last a lifetime if constructed correctly and properly cared for. Conventional wisdom claims that cement mixed with sand will take up to 100 years to reach maximum strength. Remember, the organic elements within hypertufa will eventually rot away, leaving only the sand and cement. The rock will become very porous, so avoid combinations of extreme damp and frost as this may cause some erosion and weakening.
How strong is hypertufa?
Hypertufa can withstand high temperatures and snow, rain and anything the weather can throw at it. Remember, if you are planning to build a larger planter or pot, you must reinforce it with chicken wire or steel rods. Smaller projects usually don’t require reinforcements.
Top tips
- Coconut fibres: I found that using coconut fibre is good because not only is it inexpensive, it looks great and the small fibres add to the overall strength of the trough. You will often find this material in the lining of hanging baskets
- Reinforcing your pot/trough: If you are making a very large hypertufa pot or stone trough, then I’d recommend reinforcing it with chicken wire and/or steel rods to give it extra strength and flexibility. Also, make sure that the wall sides are a lot thicker to increase the overall strength
- Earth moulds: If you are after a very naturalistic effect, you could try making your trough within soil or sand. You can do this by digging a hole, adding your base mix and then inner moulding, such as a plastic pot. You can then carefully dig your hypertufa pot out and brush it down to remove soil/sand
- Drainage: Remember, make sure to remove the drainage plugs early on in the process. I didn’t for the above project and I had to drill them out later! I really don’t know why I opted to use square plugs in this instance! If you forgot to add drainage holes, simply drill them out using a masonry drill bit. Don’t use hammer action as this may break your pot. Before doing this, wait until curing is complete
- The ageing process: If you want to accelerate the ageing process, try painting your hypertufa planter with natural yoghurt or cold rice water. This will encourage the development of lichen and moss growth
- Safe for planting: Don’t forget to allow the remaining strong alkali or free-lime compounds in the cement to leach out. One method is to leave your pot/trough out over winter to be washed by the rain. During spring, it should be a safe enough container to grow vegetables or herbs
- Easy plants to try: The easiest plants to grow in hypertufa are succulents. They are very tough and rewarding plants, that require little watering or care. Succulents can cope well with shallow soil/compost. Ensure that the growing medium is well drained. If you are using compost, add plenty of gardener’s grit or normal garden soil
- Raise your planter: I would recommend putting your pot/trough on bricks or feet to raise it a little from the ground. This will help protect your planter and improved drainage. You also could try making your own hypertufa feet
- Indoor application: Hypertufa is tough and versatile. Your creations don’t have to be limited to the garden. You can easily create pots and sculptures to adorn your own home space. I’d would recommend glue felt to the underside to avoid scratches to floors and furniture
Other hypertufa projects
There are so many uses for hypertufa. I have used this building material to create millstones, name plaques, fake rocks and even realistic stone-like stepping stones!
Still stuck for ideas? Don’t forget, hypertufa is not just all about garden planters. There are so many uses for this amazing stone substitute. You can use it to create: sculptures, artificial rocks for rock gardens, stone walls, paving, ornaments for both indoor and outdoors, sign posts, house numbers/names and plaques, water features, picture/mirror frames, garden furniture, and many other applications.
If you are embarking on amazing hypertufa projects, let me know about it by submitting a comment below! You may have an alternative mix for us to consider. New ideas and recipes are always welcome.
For more information and recipes, or other hypertufa ideas, please visit thehypertufagardener.
Hypertufa fun fact
The Romans may have used something similar to hypertufa to create many of their impressive buildings which still stand today. Roman concrete was a mixture of 85 percent volcanic ash, fresh water, and lime. It was far less harmful to the environment than Portland cement. The mixture was so strong, researchers today are desperately trying to replicate it. This is understandable. After all, many of these Roman buildings are still standing after a couple of millennia! What have the Romans ever done for us? Perhaps we should give them the credit for hypertufa, amongst other things.
Frequently Asked Questions About Hypertufa
What is the lifespan of hypertufa pots?
The durability of a hypertufa planter or pot is determined by the ingredients used. Sand-made constructed items can last for 20 years+. However, they tend to be heavy. If you use perlite instead, the container will be much lighter, but it will most likely only last ten years or so.
What is the composition of hypertufa?
One part cement, one part coconut fibre and one part sharp sand
How durable is hypertufa?
Hypertufa is also roughly two-thirds the weight of concrete. It is not as strong and shouldn’t be used for anything structural. It is for decoration only.
Can I have fish in a pond made of hypertufa?
The pH of the hypertufa is on the high side. If you are intending to add it to a structure near fish, let it weather for a couple of years to allow for lower levels of lime.


Thanks for this, I’ve looked into it before, but most articles are VERY specific and put me off experimenting. Looking forward to getting messy this weekend. 🙂
You’re welcome. I have my stone trough on the steps leading up to my house. I still pause for a few seconds every time I walk past mine – Looks so realistic. As you can see from the first image, I have filled it with Sempervivums and Sedums.
Good luck with your hypertufa project!
Could this be used to hold water? Like for a bird bath or a small sink?
That’s a good question. I’d say no. The organic materials added (coir) will degrade over time, leaving you with a lovely porous stone-like effect. The water would simple leak out. May be you could add some kind of tanking paint or weather proofing?
How big can you go? How much does it weigh? I am looking to build a large (6ft X 8ft) raised bed.
Sorry for the delay in getting back to you Jill. You can go a big as you want. Just ensure, if you go beyond a about 500 mm in width, you’re going to need some kind of reinforcement. You can use thick metal wire for smaller troughs and perhaps steel rods for large. The troughs are pretty heavy. No far off the same weight as concrete.
Hello James,
It has been 3.5 years or so since you made this trough. I’m wondering if it is still holding up. Would you do anything differently?
Hi Pat, Sorry for the delay. Still going very strong. In fact, it is looking better than ever! The older it gets, the more like stone it becomes. Cement will improve with age anyway, as the microscopic crystalline structures continue to knit together. They say that concrete is at it’s strongest after 100 years!
I knew a fellow, several years ago, who made hypertufa using old tennis shoes. Since I lost touch with him, I never found out how that worked. Have you ever heard of that?
I have never heard of that, but love the idea 😉
I use my husband’s old work boots as planters. Of course they deteriorate rapidly and last only a couple or 3 years…then I confiscate another pair of old work boots. How would you recommend using these boots as a form for a project like your trough? I would not want to fill the interior of the boot with cement, but would like to make the old boots more durable as a planting medium but still preserve that rugged appearance.
That sounds interesting! I suppose the key is going to be drainage: Make sure that you have holes in the bottom of each boot. Also, put a layer of broken pottery or stones at the bottom, with a layer of grit.
There are plenty of plants such as sedums or Aizoaceae succulents that would thrive in such an environment. Let me know how you get on.
I love your “stone” planter. Could you give me the approximate measurements (height, depth, width) of your planter? It is so beautiful and I love the way you have chiseled it to look like stone. Gorgeous! I want to make one similar to yours but I have to watch the weight since I will be handling this by myself. Thanks for your step by step guide.
Hey, you are welcome 😉
It’s about 500mm x 300mm and about 200mm high. Thickness is about 40 mm.
I hope it goes well. If you are worried about stability or would like to build a larger trough, it might be worth using chicken wire.
I have been trying to find approximate amounts of each ingredient to make a trough the size of yours. do you remember how much of each you used or is there another site that lists this? thanks for any help you might have
Hi Julie. I tend to use 1/3 for each coir, sand and cement. Add water until the mix is on the consistency of porridge. Do this slowly as too much water will weaken the mix. Good luck!
A few yrs ago I covered an old pot sink with hypertufa, and I used my fingers, wearing rubber gloves to give it an aged look, and it turned out really well, I was scared of hitting it or using other tools to age it in case I broke it, lol.
I covered it with natural yogurt and it soon started to grow moss and lichen over it, someone has given me another old pot sink so am glad I found you and got the recipe to make another one.
That’s great! Yogurt certainly helps. If you have any old strawberry or pea nets, you might want to loosely wrap you pot with this first, before adding the hyperfufa. That should give it a little extra strength as the plastic fibres blend with the hypertufa mix.