This article has been written to provide you with the best advice on how to look after orchids as a house plant. You will soon learn that orchid-care is not complicated and you will soon be impressing your friends and neighbours with your prolifically blooming orchid plants!
How to look after orchids: A beginners Guide
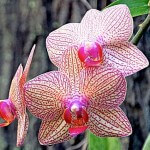
Phalaenopsis orchids (also known as the Moth Orchid) are rapidly becoming the most commonly grown houseplant in the UK. In the last 10 years, they have grown into a huge industry with every supermarket and garden centre now stocking them. However, most people don’t have a good understanding of how to look after orchids and get the most out of them. The Phalaenopsis orchid requires care and the appropriate growing conditions, to keep them healthy and in bloom.
1. Growing environment
Temperature: This most important factor when it comes to understanding how to look after Orchids and get the most out of them. Orchids don’t like change. They prefer a stable temperature of no less than 58 degrees. Anything between 60-80 degrees will be of benefit to your plant.
Situation: Orchids naturally grow in dappled shade. An east or west-facing window with shades or nets is ideal. They will need about 70% shade and 30% sun. Prolonged direct sunlight will cause the leaves to turn yellow from the centres and eventually drop off and possibly kill the plant. Bathrooms are ideal. Don’t place it too close to a window. Even double glassing is not enough to protect your orchids from the coldest nights.
2. Orchid re-potting & growing medium
Phalaenopsis orchids grow on other plants and trees and not in soil. As a result, they are used to being high above the ground, gathering moisture from the air with aerial roots.
An ideal growing medium:
- Fir or redwood bark (for structure)
- Coconut husk chips or sphagnum moss (optional – for moisture retention)
If looking after orchids is your priority, it would be advisable to buy a dedicated, very free draining orchid growing medium from your local garden centre.
When to repot: The best time to re-pot is spring. During this season, your orchid will start to grow new leaves and roots. If you re-pot now, you will benefit from a natural growth spurt.
Using a larger pot: If the orchid roots are starting to distort the pot, then you will need to size up. However, orchids do like to be a little snug, so don’t change the pot size unless you have to.
Every 2-3 years: Keeping an orchid in the same growing medium for more than 2 years, may result in complications as the growing medium starts to compost.
How:
- Sterilise a pair of scissors or a sharp knife. You will be using these during the re-potting of your orchid. Rubbing alcohol is perfect for sterilisation. If you are using this, allow the alcohol to evaporate before using it. You can also try using a lighter flame to burn off any residual sterilising solution.
- Remove any existing flower spikes, cutting as close to the base as possible.
- Squeeze the pot to loosen the roots from the side of the pot.
- Carefully lift the orchid from its pot by firmly holding the base of the plant. Don’t pull the leaves as this may result in damage. If roots are protruding out of the bottom or sides of the pot, you may remove them.
- Untangle the roots and remove the spent growing medium. If this proves to be difficult, try wetting the roots under a tap to lose the growing medium.
- Remove dead roots with a sterile, sharp knife or scissors. Live roots are green, white or yellow.
- Cut the roots back to about 6 inches.
- Prepare a new pot or sterilise the old one. The pot must be transparent because the roots of the Phalaenopsis orchid prefer light. Also, this will help to show if the growing medium needs watering.
- Place a layer of the growing medium into the bottom of the pot. This layer should be between 1-2 inches deep.
- Place the orchid into the pot leaving any roots that were previously outside of the pot (aerial roots) in the same position as before. These roots are already adapted to the air and may rot if tucked into the pot. Make sure that the base of the orchid is above the rim of the pot. It would be a bad idea to bury your orchid as this may result in rot.
- Push the remaining bark chips into the pot and around the roots, tapping on the sides as you do so. This process will take a long time, but your patience will pay off. Try to fill all of the gaps if you can, but leaving some is not a problem. Be careful not to damage the roots.
- For decorative purposes and eases of watering, you might want to add pebbles to the top of the pot. Aquatic peddles are ideal, bought from a pet shop.
- Support your orchid with a new, clean stake and tie.
- After 1 week, water your orchid well and drain. Leaving it for this time will allow for damaged roots to heal.
3. How and when to water your orchid
There are a couple of indicators to let you know about how to look after orchids concerning watering:
- If the roots are silver or grey and not green
- If the bark or moss is completely dry
Top tip: To test moisture levels, push a lollipop stick into the growing medium and then take it out. If the stick feels moist, then it doesn’t need watering.
Water your orchid with rain water. Ideally, the water should be tepid or at room temperature. Cold water from a tap or water butt may cause the roots to rot and kill your plant.
Water every 4-5 days during the summer and once a fortnight during winter. Ensure that the growing medium is kept moist at all times.
Try placing your orchid plant on a tray of wet gravel. As the water evaporates, this will increase the humidity around the plant. Note: the orchid should not have direct access to the water. This will cause your plant to rot. Make sure that the bottom of your pot it not submerged in the water.
4. How to look after orchids by feeding them!
Learning just how to look after Orchids can seem to be quite a responsibility. Like all living creatures, orchids need feeding to help them grow. These feeds occur through complex processes in the orchid’s natural habitat. In our homes, orchid food is scarce. Because orchids grow in trees and rocks, the nutrients they need are difficult to obtain. This is the reason why they grow so slowly. The main chemical that the Phalaenopsis orchid craves is nitrogen.
Whichever fertilizer you choose, select one that contains nitrates as opposed to ammonia. Nitrates are far less toxic than ammonia and preferred by your orchid.
The best time to feed your orchid is just after and not during blooming. This will encourage it to put out more growth and flower buds.
5. PRUNING ORCHIDS: how to look after orchids after flowering
Once your orchid has stopped flowering, you are left with an ugly stick where once lovely blooms hung. Sad.
One of the best ways to encourage more flower growth is to have a temperature variance of about 15 degrees. From 60 to 75 degrees is ideal, from night to day.
Don’t just chop off the spent flower stem! Counting from the base of the plant upward, you will find a series of notches going up the flower stem. Cut just above the fourth node with a pair of sterilised scissors. This will produce a single and sometimes a double shoot from the top of the growing tip of the existing flower stem.
What to do with Orchids during Winter
Keep them out of drafts. This can result in the loss of flower buds and even leaves.
Don’t deprive your orchid of light! Place them in a partially sunny, east/west facing window if possible.
Don’t let your orchid dry out: Although the growing medium shouldn’t be wet, keep an eye on your orchid during the Winter months. If the leaves are starting to look wrinkled and the root dry, then it is time to spray your orchid with a little water.
Keep away from dry heat: Avoid putting your orchid too near a radiator or fan heater. Orchids prefer a humid environment, not dry.
Frequently Asked Questions About Orchids
How often do orchids bloom?
A happy orchid will flower 3 times a year, with a typical lifespan of a decade! Lots of blooms makes the Phalaenopsis orchid great value for money.
How to Get an Orchid to Flower Again
Dormancy with orchids usually lasts six to nine months. Your orchid will then have enough energy to rebloom. However, orchids occasionally require assistance with this process. You can rebloom an orchid by ensuring that you look after it correctly. If you have a Phalaenopsis (Moth) orchid, don’t cut the blooms down to the base when they have finished. Moth orchids often rebloom on the previous flower’s stem. Of course,this article is not just about how to look after orchids, but how to get them to flower again.
Do orchids prefer full sun or shade?
Orchids thrive in bright light, but direct sunlight can cause orchids to burn. An East or south-facing window with bright, indirect light is ideal. The colour of an orchid’s leaves is a good indicator of how much light it receives: A plant with bright green leaves is a good indicator. If your orchid is thriving in one spot, keep it there. Orchids can be fussy. If it is happy, leave it alone. Perhaps add a couple more orchids to that same spot.
How long can an Orchid live for?
Orchids can live in the wild for up to 20 years, depending on the type of orchid and the environment. Potted orchids do not have the same life span as live orchids, but with proper care, orchids can live for 10 to 15 years. There have been reports of orchids living for much longer periods.
Should You Mist Your Orchids?
Although they enjoy misting, this method of watering will not provide an orchid with enough water or moisture for it to survive. An orchid requires regular watering, usually once a week.
Resources
I hope you have enjoyed our tutorial on how to look after orchids. Please feel free to link to this page or share and like it via social media.
Fact sheet on Phalaenopsis orchids or MissOrchidGirl:
Some varieties of orchids are considered to be family-friendly and non-toxic. For more information, please visit my post on non-toxic plants.